Monday, March 12, 2012

My Favorite Zoo Animals

Students make this booklet to create a zoo environment for their favorite wild animals. The animals are put into cages.


Here are the steps for this pop-up book:

1. Fold three pieces of paper in half and cut nine slits down from the fold.


2. Push the cut area through the fold and crease it to form a pop-up section.


3. Make the other pop-up pages and glue their back to another folded sheet with a different color for contrast.


4. Draw three different zoo animals, cut them out, and put them into their respective cages. Write sentences to say why you like those animals, for instance, I like monkeys because they're funny. They have long arms.


My Secret Wild Animal Booklet

Children are curious by nature. Here's a booklet my group made to describe the animals of their choice before they were revealed.


Here are the steps for this booklet:

1. Divide the creative paper (or any A4 paper) into three parts both lengthway and sideway. Open it and cut out the four corner pieces to make a large plus sign.


2. Fold the pages in. The order doesn't matter.


3. Write down a sentence that describes the chosen animal on each fold. 
For instance:


4. Draw and write the name of the animal in the center to reveal what it is.


5. Use a strip of paper to make the cover, folding both ends to the center and punching the center of the top flap.


6. Glue the folded pages to the center of the cover.


7. Thread the yarn or ribbon through the hole. Pull it over the top of the cover so that there is yarn/ribbon in the front and back of the book. Make the ends even. Tie the yarn with a double knot. Don't make it too tight.  


Wednesday, February 29, 2012

Funny Faces with Flip Books


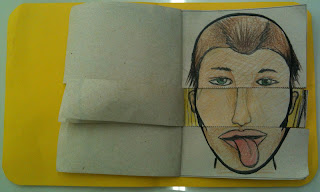
The students create flip books in which eyes, eyebrows, noses, ears, mouths, teeth, and tongues get all mixed up to produce some very funny faces.


1. Distribute two copies of the head outline to each student. They will each have 4 face outlines. Tell them that they are going to use their imagination to draw different faces.

2. Point to the horizontal lines and explain that these lines are the secret to making the faces really funny. Demonstrate how they should place the hair, the eyebrows, and the eyes above the top line, the ears and the nose centered in the middle line, and the mouth, the teeth, and the tongue below the bottom line.
3. Encourage the students to add anything else they wish to the picture, such
as wild hair or a silly hat.
4. After they finish their drawings, have them carefully cut along the horizontal lines.

5. Next, staple the 4 face outlines for each student and make a cover for the book.

6. The students can sit in pairs or groups of three to flip their books and describe their funny faces.

Students practice saying: He has short straight brown hair. He has green eyes. He has a long tongue. He has a small nose.


Here are their projects:


Alternatively, you may have the students find large photos of people in magazines, staple the pages together, and cut below the eyes and above the mouths.


Friday, January 27, 2012

First Day Ideas

Name Bingo
On my first day of class, I'm planning to play a Name Bingo with my 16 students.
I'll write their names on separate slips and have them choose 8 names and write them down in their notebooks for the game.


Time Capsule
I'll give the students a worksheet for them to complete with their personal information, likes and dislikes, favorites, and abilities. I'll collect their sheets and read the information (not mentioning their names) for their peers to guess who I'll be referring to.
After that, I'll keep all the sheets in a capsule (a Pringles canister wrapped in foil) and return them back to the students on the last day of class. I wonder if anything will have changed by then.


Storytelling
I chose "The Teacher from the Black Lagoon", by Mike Thaller. There's a fantastic YouTube video - http://www.youtube.com/watch?v=QuRlqN2aZow -  I'll show it to the students in class. Later we'll play Bingo with the book characters.


Thursday, January 26, 2012

Page Corner Bookmark

Here's the sample of page corner bookmarks I'll make with my students on the first day of class. I'll bring the templates already cut for them to fold and glue. They'll use theirs to mark the homework page. I hope they like it. 
Instructions can be seen on: http://nheilke.com/blog/?p=2628


Sunday, October 30, 2011

Nature

What is there on this landscape? Students chose a geographical feature to illustrate a card.


Next, they drew and wrote a postcard to a person they liked most.


How's the Weather?

A Window Booklet for the students to practice asking and answering questions about the weather. 
The cover is a cut-out window and the inside pages are 6 different weather conditions.


My Classroom

Students practiced asking What's this? and What's that? by making a pop-up booklet to identify some school supplies.


Monday, October 3, 2011

A Bat Mini-Book

After coloring and cutting out the bat, students cut out the story, stapled them together, and glued the pages to the center.


Felt Nocturnal Animals

Here are three nocturnal animals (bats, foxes, and owls) my group is going to talk about this week.
The finger puppet bat represents "Stellaluna", a beautiful story written by Janell Cannon. I'm sure they'll love it.


Sunday, October 2, 2011

Clothes - A Craftfoam Booklet

I used craftfoam for the pages and the cut-outs to make this booklet and have the students practice the vocabulary related to clothes. They pretended they washed the clothes in a washing machine, dried them in a washing line, put them in a closet, and dressed up the boy and the girl.


Family in a Matchbox

Here's a fun way for the students to practice the spelling of family-related words.
Tape the picture of a family member to the top of a matchbox, write the letters that form the respective words on slips, and put them inside the box. 
Divide the class into as many groups as there are boxes and give each group a matchbox.
At your signal, the groups open the box and form the words related to the member illustrated on the top of the box.
This is more effectively played if the nature of the task is that of cooperation rather competition.
After you check the correct spelling, groups move their boxes to their right for a new turn with a different word.


Wednesday, September 28, 2011

Parts of the House

Here's an easy project for the students to practice the parts of the house.

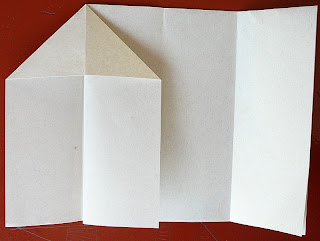
1. Fold an A4 sheet in half.


2. Crease the center of the fold.


3. Fold the left and the right parts to the center.


4. Open the fold.


5. Press the corners to form a triangle on each side.


6. Tell the students to draw the rooms in the house on the front ...


7. ... and inside it.


8. Have them label the parts of the house.