Sunday, October 30, 2011
My Classroom
Students practiced asking What's this? and What's that? by making a pop-up booklet to identify some school supplies.
Monday, October 3, 2011
A Bat Mini-Book
After coloring and cutting out the bat, students cut out the story, stapled them together, and glued the pages to the center.
Felt Nocturnal Animals
Here are three nocturnal animals (bats, foxes, and owls) my group is going to talk about this week.
The finger puppet bat represents "Stellaluna", a beautiful story written by Janell Cannon. I'm sure they'll love it.
Sunday, October 2, 2011
Clothes - A Craftfoam Booklet
I used craftfoam for the pages and the cut-outs to make this booklet and have the students practice the vocabulary related to clothes. They pretended they washed the clothes in a washing machine, dried them in a washing line, put them in a closet, and dressed up the boy and the girl.
Family in a Matchbox
Here's a fun way for the students to practice the spelling of family-related words.
Tape the picture of a family member to the top of a matchbox, write the letters that form the respective words on slips, and put them inside the box.
Divide the class into as many groups as there are boxes and give each group a matchbox.
At your signal, the groups open the box and form the words related to the member illustrated on the top of the box.
This is more effectively played if the nature of the task is that of cooperation rather competition.
After you check the correct spelling, groups move their boxes to their right for a new turn with a different word.
Wednesday, September 28, 2011
Parts of the House
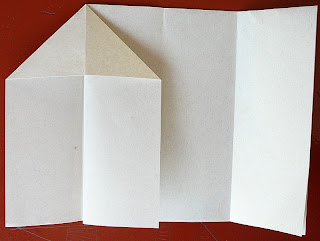
Here's an easy project for the students to practice the parts of the house.
1. Fold an A4 sheet in half.
2. Crease the center of the fold.
3. Fold the left and the right parts to the center.
4. Open the fold.
5. Press the corners to form a triangle on each side.
6. Tell the students to draw the rooms in the house on the front ...
7. ... and inside it.
8. Have them label the parts of the house.
Friday, September 23, 2011
Wheel Book - Opposites
My group is going to start working with opposites. This wheel book technique is a great way for them to identify the new vocab. Here are the instructions.
2. Make a template to mark the slits and the center on one of the circles to help you make all the other circles for your students.
6. Students write the opposite words, moving the top circle clockwise.
They write the title and the author's name on the top circle.
Have them stand up and walk around, asking their peers what the opposite words are.
My students carried out this task listening to Waka, Waka. As I paused the song, they asked the peer next to them: What's the opposite of ... ? It was hard to change the activity, for they had lots of fun.
My students carried out this task listening to Waka, Waka. As I paused the song, they asked the peer next to them: What's the opposite of ... ? It was hard to change the activity, for they had lots of fun.
Happy Birthday! Here's Your Gift.
In our lesson, we talked about toys and birthdays. The students made this card which illustrated two toys they chose to give to a peer and helped them act out a dialogue: Happy birthday! Here are your gifts. Thanks.
After that, they wrote a thank-you letter to their respective peers. They had a lot of fun.
Step Book - What I Like and Don't Like for Different Meals
Here are the Step Book projects my students developed to write about what they like and don't like for different meals - breakfast, lunch, or dinner.
Wednesday, August 24, 2011
Play-Dough Food
The students loved using play-dough to make their favorite food items. It was a very fast activity, in which I handed out a small piece of colored dough for them to mold their food and write it on a piece of paper. Next class, peers will interview each student about it.
Food Categories - Where do fruit and vegetables grow? - Pop-Up Book
Using the pop-up book is an involving way for the students to classify different food items: Do they grow on trees, on plants, or underground? We used one page for each category.
Here are the steps for a dimensional effect on the project:
1. For each page, fold an A5 sheet of paper in half and cut slits down from the fold. Narrow slits for the tree and wide slits for the plant / underground.
2. Push the cut area through the fold and crease it to form a pop-up section.
3. Glue the 3 pages back to back.
4. Label the pictures.
Friday, August 19, 2011
Food - Step Book
This is the project my group is going to develop to write about the food they like and don't like for different meals. They'll choose among breakfast, lunch, or dinner.
1. For each student, 2 A4 sheets cut in half. They receive 4 A5 sheets.
2. Place the four sheets of paper on top of one another, overlapping the ends.
3. Hold the pages together and fold them over to create more overlapping pages. Staple it.
4. Write the book title on the top page (students choose one mealtime: breakfast, lunch, or dinner), write the sentences - I like ... / I don't like ... , and draw the respective food item on each succeeding page.
Here's the sample the students will be exposed to:
Subscribe to:
Posts (Atom)


